DIY Road Shower for Van Life
Roof Rack Solar Shower
Starting Van Life requires you to set up your vehicle for a few fundamental daily needs. Cooking, Sleeping, and Washing are the main ‘everyday needs’ that come to mind, so what are going to be your options for Keeping Clean On the Road?
If you (like many van dwellers) can not live without having a shower available in your vehicle there are plenty of Shower Options suitable for mobile living that you can buy, we even shared a complete guide to van life water systems, but that is not what this post is all about.
This post is going to show you how YOU can easily make your own pressurized, roof rack solar shower for your vehicle. Sounds good right? Let’s get started!
DIY Road Shower
ROOFTOP SOLAR SHOWER SPECS:
Capacity: Approximately 18.5 Liters (5 gallons)
Total Length: Approximately 2.3 meters (7.5 ft)
Weight When Full: Approximately 21 kgs (46 lbs)
Peak Water Temperature: Approximately 49 C (120 F)*
Maximum Recommended Pressure: 18 PSI
Total Cost to Make: $70 – $120 USD (depending on location)
Assembly Difficulty: Easy
Assembly Time: 30 minutes… including test shower 😉
(*given ambient outside temperature of approximately 30 C (86 F) and exposure to direct sunlight)
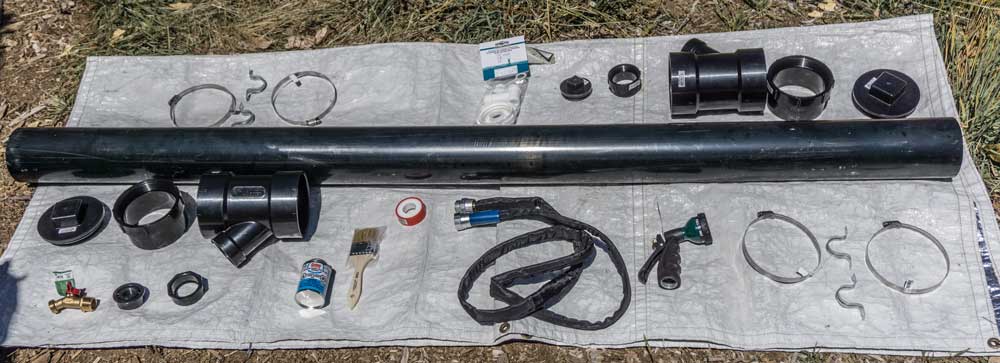
What You Will Need
Supplies:
- 1 x 6′ by 4″ black PVC (or ABS) Pipe (the thicker the better, try sewer pipe…new, not used)
- 2 x Y Adapter 4″ to 2″ converter
- 2 x 4″ to Screw Thread adapters with rubber gaskets (only required if not using fixed end-caps)
- 2 x end caps screwed or fixed, your choice
- 1 x 2″ to thread
- 1 x 2″ threaded end-cap (with rubber gasket)
- 1 x 2″ receiver for the thingy below
- 1 x 2″ standard tap thread cap
- 1 x standard hose tap
- 1 x pot of quick-drying PVC cement – make sure it is non-toxic, like this one
- 1 x PTFE tape for tap thread
- 1 x quick release system for hose (optional, not pictured or used in this video, but still a good idea)
- 1 x Flexible (or non-flexible) Hose
- 1 x multi-spray pattern hose end. (Avoid the one with the plastic thread)
- 1 x water jug lid kit (you only need the tiny piece of plastic used for pressure relief)
- 4 – 8 x 4″ Heavy Duty jubilee clips for mounting
- 2 – 4 x u clamps for mounting to roof rack (optional, depending on your rig and setup)
- 1 x Schrader valve for pressurizing shower (optional but a pretty cool upgrade)
- 1 x Epoxy glue to install Schrader valve if required (optional)
Tools Needed:
- Flat Head Screwdriver
- Rubber Mallet (or 1 green coconut)
- Drill for Pressure Relief Valve (optional but recommended)
- PVC End-cap Tool, or wide box head wrench to tighten the end-caps (optional, but may leak without it)
Assembly
It isn’t rocket science, you won’t classify as a mechanical engineer once you are finished. Glue the pieces on both sides and put them together with a quarter turn to snug them down. The PVC Cement dries in 30 seconds but can be much quicker on a hot day. Use your rubber mallet or coconut if you need to encourage the parts together.
Don’t fill it with water until you’ve lifted it on the roof. Don’t drive anywhere until you’ve stripped it down….but you already knew that, didn’t you? 🙂
Pressurize Your Shower
Your shower will be self-pressurizing with the heat from the sun. The more air you have in the tube the quicker it will heat up and the more pressure you will have. The shower pressure is mainly supplied by gravity, the higher you mount it the better your shower pressure will be.
You can add a Schrader valve (like the ones you see on a bicycle tire) into your shower. You can either epoxy on a nut, so that you can screw in the valve or epoxy the value directly into your shower. If you are going to do this you should install it as well as possible and preferably onto a flat area with thick plastic. The lids work well for this.
You can add air via either a small tire compressor or a bicycle pump. We had a hand pump zip-tied to our shower.
WARNING: If you are going to pressurize your shower with the air you really should have a pressure relief valve installed! The plastic one shown in this video won’t withstand 18 PSI. You could adapt a lid from a car radiator to provide a functional pressure relief valve.
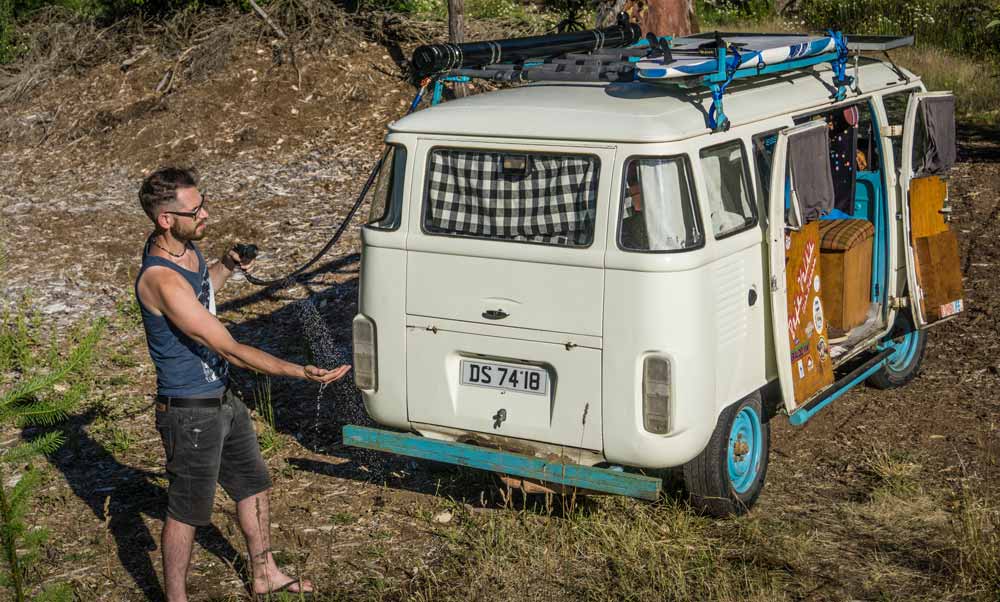
Mount It Onto Your Roof Rack
Be sure to mount it well, it’s very dangerous if you don’t! Also, the shower will last a lot longer if you ensure that it has minimal movement when you are on the trail.
Be sure that your vehicle gutter is strong. Our gutter was ripped off after long-term use. This may or may not have been due to rust, but the extra weight of the shower sure didn’t help. We typically advise people to keep the weight in their adventure rig low and centered, so high and on the side is the opposite of this. Be sure that your rig is capable of handling this load and take into account balancing the overall weight of your vehicle and its occupants when planning where you will install the shower.
Driver Side Mounting – Good because it keeps your access ground dry. Bad because you have to leave your main entranceway whilst showering which can be a security risk
Passenger Side Mounting – Good because it’s easy to access to living space and better load balancing against the driver. Bad because you muddy the floor and can track that dirt through into your living quarters
Customized Design Considerations
- The shower will be more likely to leak if you have multiple sections of tubing joined together. One continuous piece of PVC tubing works best.
- Screw thread end-caps are more prone to minor leaks (and more expensive) than fixed end caps, but they do allow access for cleaning (which is desirable for long term use)
- The more your rooftop shower flexes the more likely it is to spring a leak over time, especially if you drive off-road. Secure it well!
- If you are Overlanding, be advised that the availability of the parts you use is not guaranteed. We had to rebuild our shower from scratch because we lost the filler cap
- If you can’t find black PVC tubing, you can always paint it with black matte paint, it works almost as good.
- If you can weld Aluminum we recommend you take the same(ish) design principle and make it out of aluminum for a more durable solution
What We Like About Rack Mounted Showers
- It’s out of the way of your living space.
- You don’t have to get your shower out at camp, it’s already out.
- It’s easy to fill and use.
- It’s always getting hot (unless you’re in Alaska)
- It’s a reasonable amount of water capacity
- It’s solar heated and fairly environmentally friendly
What We Dislike About Rack Mounted Showers
- PVC-made showers can sometimes leak, depending on how well you make them. Pre-made Aluminum Rack Showers are obviously more durable
- Availability of parts and pieces isn’t the same everywhere if you travel internationally
- If one seal or part breaks it can mean replacing a whole section
- Unpressurized showers don’t have good water pressure on low-top vehicles.
- Over-pressurizing can be dangerous in a plastic pipe (make sure you have a pressure relief valve)
- People are forever asking your what that tube thing is on your roof.
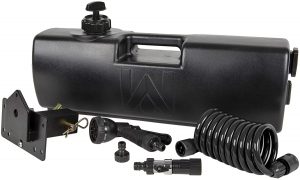
Road Shower – A Metal Pressurized Rack Mounted Solar Shower
If you’d rather just buy a ready-made product then we can recommend the Road Shower

Road Shower Alternatives
The Road Shower is kind of pricey, to be honest, but thankfully there are alternatives to the road shower that are appearing on the market.
This one can either be mounted high on your rack or low on your tow hitch bar which is much safer and better for vehicle handling.
Wash off equipment, shoes, mud, shovels, and most importantly hands BEFORE you enter your vehicle.
Whatever water system you decide to install, it is worth keeping in mind how convenient an outside water system is,
so if you can, try to have outside water in addition to your inside sink
Camplux 6L Tankless Instant Water Heater
Best Shower For Van Life
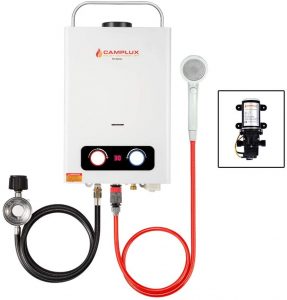
Specs and Price on Amazon
European Option Amazon
The Sun Heated, Rack Mounted Showers are simple and great for van life in the summer. But the truth is, often you will want to shower when the water isn’t warm. For this reason, if you can install one – this type of instant water heater is the best shower option for luxury van life! If you want a budget alternative, check out all the best shower options for van life here.
Check out this DIY Custom [ENGINE HEATED] Hot Water Shower
You may also like