Van Life Electrical Systems – A Complete Guide and Wiring Diagram
Building a mobile Off-Grid Electrical system for a van, truck, or motorhome is one of the most exciting and challenging parts of any vehicle conversion project. In this post, we’re sharing how we built our Van Life electrical system to ensure that we could live and work off-grid full time in our campervan as we drive around the world, and how you can do it too.
This article focuses on the equipment that is needed to build an off-grid electrical system for van life. We’ve included an interactive universal wiring diagram and materials list so you can see exactly what is involved in building the system.
Building a vehicle electrical system for an off-grid living can be dangerous! It is essential that you thoroughly research and prepare sufficiently to build a safe and reliable system. That said, with care and the correct approach, previously inexperienced people can carry out installations.
In addition to this article, we’ve put together a Complete Guide to Vehicle Off-Grid Electrical Systems to help you succeed at building your Off-Grid System! The guide also includes a Full Universal Wiring Diagram and a Step-by-Step Tutorial. This guide is a vital time-saving resource and will help a great deal in providing you with the knowledge required and the confidence to build your own electrical system.
Now let’s look at the required equipment.

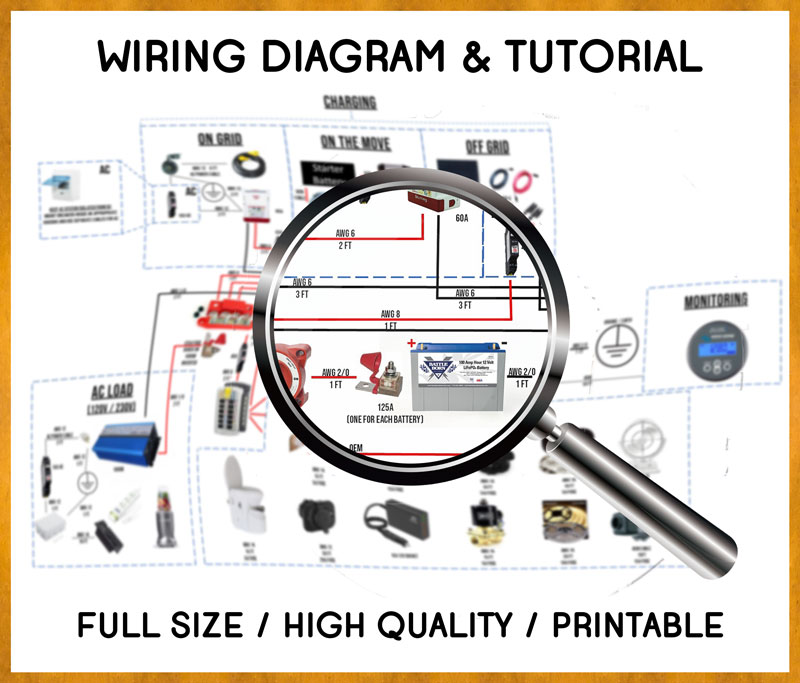
Full Size Printable Wiring Diagram
DC Fuse Panel
The King of Toilets
The King Available Here on Amazon
We compared your pooping options for vehicle dwelling here
This Maxxfan
Get this model, rather than the automatic one
12V DC Sockets
Off Grid Fridge Options
12v Hub Quick Charge Power Station
Charges your devices more efficiently than via the inverter
Wall mountable
Available on Amazon Here
12v Water & Gas Solenoids
Check out our Free Guides to Van Life Water Systems & Propane Systems
Van Sink Options
12V LED Stip Light (Warm White)
Sirocco II Wall Mounted Fan
Onboard Heater
Check out Vehicle Heater Options HereOr go with the the one we have the Webasto Air Top (it's Good)
Ninja Bullet Blender
Universal Power Socket Board
Universal Power Socket (wall mount)
AC Junction Box
Ground / Earth
AC Breaker
HD AC Power Cable
PSW Inverter
12v Fuse Block
DC Breaker
Positive Busbar
Negative Busbar
High Amp Kill Switch
Battery Terminal Fuse Block
Battery Monitor Shunt
Battery Monitor Shunt Gauge
Ground / Earth
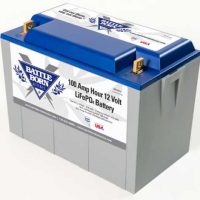
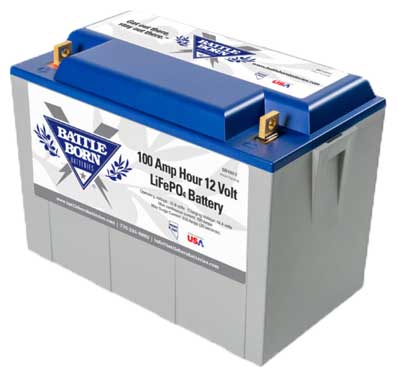
Battle Born Battery LiFePO4
Available on Amazon Here but currently on SALE directly via Battle Born Batteries
(including free shipping in the US)
DC Breaker
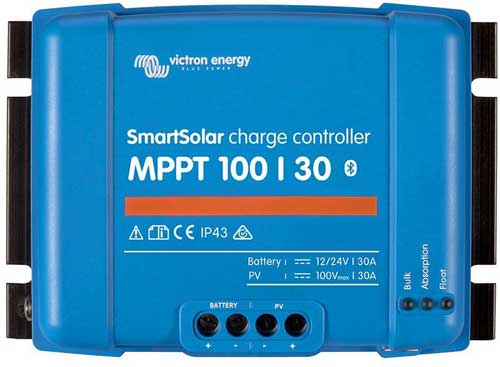
Victron 100 | 30 Solar Charge Controller
DC Breaker
Roof Entry Gland
MC4 Solar Branch Connectors
Solar Cable
High Quality Monocrystalline Solar Panel
DC Breaker
DC Breaker
DC Breaker
Sterling Power Battery to Battery Charger
Onboard Air Compressor (optional)
High Output Alternator
Vehicle Starting Battery
Available inside your vehicle 😉....and also here on Amazon
Global Smart Charger
Ground / Earth
AC Breaker
AC Breaker Housing
AC Hookup Cable
This van electrical wiring diagram is interactive. It contains all of the major components that you might find in a typical adventure van electrical system. Click on the items to find more information about the products and their current prices.
Click here to Download a Full Printable Wiring Diagram & Step-by-Step Tutorial to build your off-grid electrical system.
CONTENTS
POWER SUPPLY
Choosing The Best Battery For Vehicle Dwelling
LOADS & APPLIANCES
Selecting The Correct Inverter
Are Inverter Chargers A Good Idea?
Portable Power Stations For Weekend Warriors
BATTERY CHARGING
Video Van Tour of our Electrical System
Calculating How Much Solar You Need
Rigid Solar Panels vs. Flexible Solar Panels
Unlimited Off-Grid Power Solution
Recharging Whilst Driving (Alternator Power)
Shore Power Hook Up (On-Grid Charging)
BUILDING YOUR OFF-GRID ELECTRICAL SYSTEM
DISCLOSURE:
This post contains affiliate links, which means that if you click a product link and buy anything from the merchant, we will receive a commission.
The price you pay remains the same with or without the affiliate link.
Vehicle Dwelling Battery Systems
What Size Batteries Do you Need For Van Life?
We need to take a few theory steps before you can jump into the fun part of connecting all the equipment. The first step in designing a van electrical system is calculating how much power you will need to run your off-grid life.
To do this, you will need to work out what devices you will have in your vehicle and how much power they draw.
For reference, here is a typical small form factor campervan power usage.
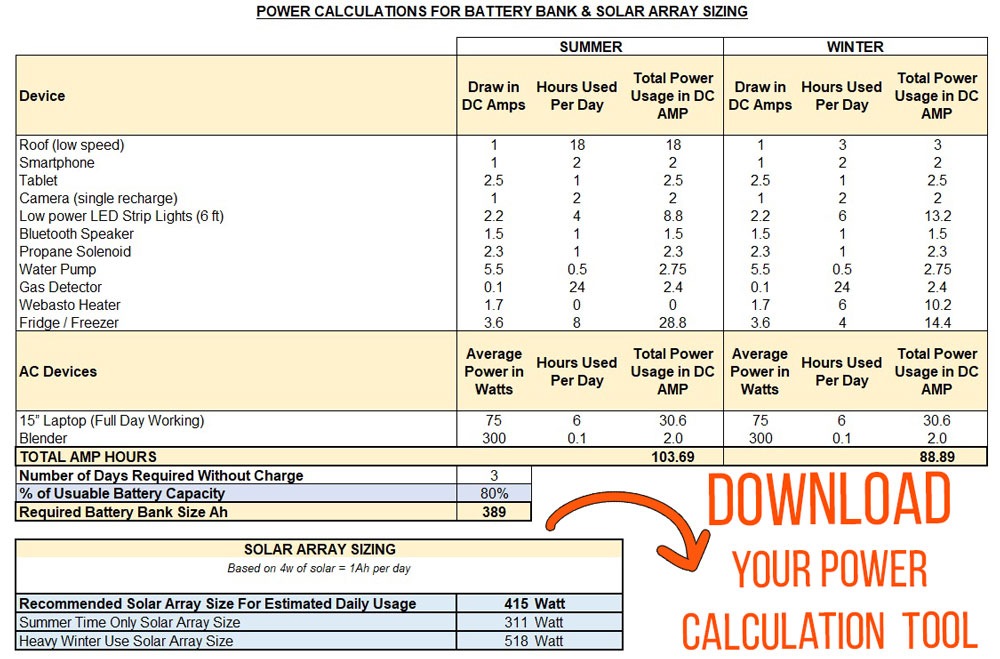
In this example, we calculated the power usage both in summer and winter as we use our equipment differently depending on the season, and thus the power usage is different. We will build the system for whichever value is highest, in this case, summer van life.
In our calculations, we’ve also taken into account the number of days autonomy we want to help us plan for off-grid sustainability and also how much of our battery bank we want to use, we’ve selected 80% because we’re building this system for use with the latest Lithium Ion Phosphate Technology and although they can use 100% of the capacity, 80% would ensure a longer lifespan, so we’re going with 80%
This example is telling us that we need almost 400Ah of Batteries. WHAT?! Don’t worry, we have very high power requirements because we live and work full-time off-grid and on the move. We need to ensure we have 100% power availability even when there is no sun; that is why we have built our system for multiple days of autonomy without a charge. Most people will not need as much power as we do.
This Power Calculation Tool is included for free with our Complete Electrical System Guide & Tutorial.
Click here to download our power calculation tool to help you calculate your power requirements
(as well as how much solar you need to sustain your power usage.)
What Is The Best Battery For Off-Grid Living?
In our Guide to Off-Grid Electrical Systems, we discuss all the available options in more detail. Still, for simplicity, the best battery option for van life is either AGM or Lithium Ion Phosphate.
200Ah AGM | Battle Born Batteries 100Ah Lithium | |
| Actual Usable Capacity | 100Ah | 100Ah |
| Cost Up Front | $390 | $899 |
| Number of Cycles | 600 | 3000+ |
| Cost Per Cycle | 0.65c | 0.30c |
| Dimensions | 20.5 x 9.4 x 9.4 (inches) | 12.75 x 9 x 6.9 (inches) |
| Weight | 129lbs (58.5kg) | 31lbs (14kg) |
| Battery Protection | none | Integrated BMS |
| Notes | Better at low-temperature performance | Better at…well, everything else |
When you stack up Lithium vs. AGM, you can really see that Lithium is a clear winner even before you consider that a Lithium battery bank can be charged significantly faster than AGM, which makes a huge difference when you are living in a vehicle.
Purchase Direct From Battle Born Batteries – Discount Code: kombi to save an additional discount
Check out The Battle Born Battery Sale
When should you choose AGM over Lithium?

AGM batteries, on average, tend to have better performance and resistance to low temperatures, so if you must install your batteries outside of your vehicle and you will frequently be chasing icy conditions, then AGM might still be the best option for you. However, some Lithium batteries can still be used below freezing. Check the spec sheet on the battery for more information.
AGM also has a lower entry barrier, so it’s a good option if vehicle dwelling is only temporary for you and you don’t think that you can recoup the larger investment into Lithium batteries.
We have heavily tested both technologies we would really encourage you to invest in Lithium Ion Phosphate as we are confident that you would not regret the decision.
What about Lithium Battery Safety?
Lithium batteries are the clear winner Lithium batteries have had some bad press over the years; however, Lithium-Ion Phosphate chemistry(LiFePO4) is safer, much more stable, and resistant to ‘thermal run-away.’
Still, we were concerned, so we did a lot of research into all the lithium battery suppliers. We chose Battle Born Batteries because of their build quality and the safety features of their Battery Management System. This BMS would ensure that our battery bank couldn’t be overcharged or over-discharged. If the temperature were ever outside of the required parameters, the battery would shutdown itself to protect us. If you want to know more about why we chose these batteries, watch the video at the top of the page.
1 Year Later…
How Do Battle Born Batteries Hold Up?
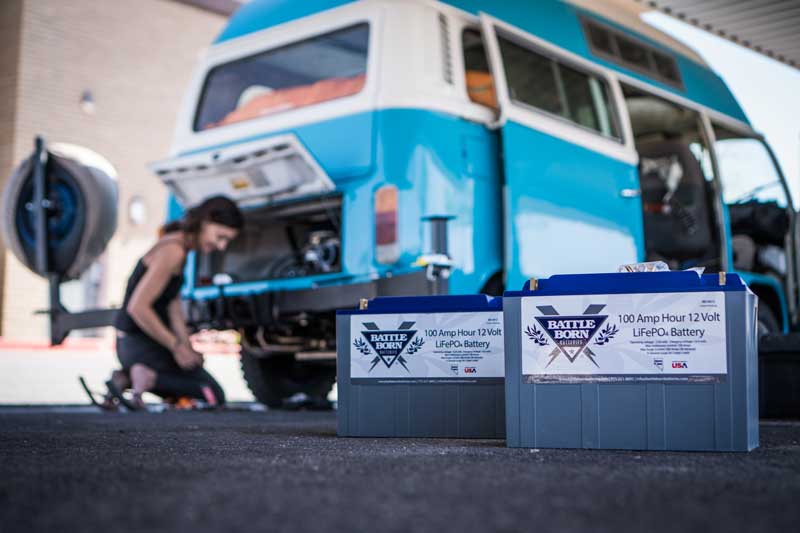
Wondering how our 4 x 100Ah Battle Born Batteries held up after a year plus of heavy daily use? Well, they are amazing! They perform way better than expected and function exactly as they did when they were new, just as advertised. The improvement in usability and fast recharge has been a game-changer in how we live and work off-grid and on the move. Upgrading to Battle Born Batteries was a step forward, and we’re never looking back. ?
We asked Battle Born Batteries if they could hook you guys up with a discount, and they have!
Use code kombi to get 5% off your purchase directly from the Battle Born Batteries Website.
Kombi Crew Members get an extra 10% OFF sale prices guaranteed
Discount Codes Available here on this Kombi Crew Post
BATTERY FUSES
Whichever battery you install, you must ensure that you use a high amp fuse to protect the cabling and the entire system. The best solution bolts directly onto the battery terminal. It’s not cheap, but it won’t blow unless it needs to, and if it does, you will be glad you have it! We installed a 100A Cube Fuse on the Positive terminal on each of our Batteries.

Check availability and price on Amazon.
Why only 100A? Our battery bank and cabling is capable of putting out more than 100A safely. We have 4 x 100Ah Battle Born Batteries wired in parallel, which means we draw up to 400A continuous or 800A burst. That is A LOT of current, and our particular system should never need to supply this load. The fuse’s job is to protect the cabling and the components in the system. We’re happy to limit the current coming from anyone battery with 100A terminal fuses as any higher than this would indicate a fault situation and overload our cabling. You will need to decide on the correct fuse sizes for your specific set up. As a general rule, if you have multiple batteries and the batteries are wired in parallel, then your terminal fuse sizes for each battery will become smaller.
What are Busbars and Why You Need Them
Busbars are a power distribution block that can be used to join multiple cables. You’ll have at least 2, one for the positive and one for the negative side of the circuit. The main battery cables and cables from the primary charging devices (solar etc., discussed below) all terminate on the busbar, and it should be able to handle the maximum expected current for your system.
Prices and availability on Amazon

12v Electrical System Safety – Battery Kill Switch, Breakers & Fuses
Installing a Battery Kill Switch between your awesome off-grid electrical system and the battery is essential. Being able to rapidly turn off all the power with one switch is an essential safety feature if anything unforeseen were to go wrong in the future. It’s also nice to have for when your vehicle is in storage.
Check availability and prices on Amazon.

12V DC Breakers are used for each of the positive connections for the main charging components in the system (solar, shore, alternator, etc.). Breakers have 3 main benefits to your camper electrical system. First, they protect your system’s other components if a fault condition occurs and an overcurrent is produced. Second, they can be reset rather than replaced (as is the case with a fuse) if a short happens. And third, they allow you to easily isolate a section of the system for maintenance or if monitoring or when storing your vehicle. This is surprisingly useful!
There are some cheaper DC breakers on the market, but when you see the build quality and what is inside them, we opted for High-Quality DC Breakers that mounts nicely on a standard DIN rail. We like having all of the breakers in one location on a DIN rail rather than in different locations (i.e., inline or surface mounted breakers). When it comes to protecting your investment in your off-grid electrical system, don’t mess with a cheap breaker.

There is a difference between AC breakers and DC breakers – and you must use the correct breaker for the correct type of circuit. We’re not going into the difference here, but if you want to geek out and see inside these breakers and why they are different, then watch this video about breakers here.
All the correct breakers for AC and DC are linked in this article for you, but if you find that you need to source different AC breakers for your system, then we have linked all of the part numbers here so you can find them easily. These AC breaker work for both 120v – 230v
The alternative to DIN Rail mounted Breakers is to use surface-mounted breakers. Blue Sea Systems offer a good quality surface mounted breaker. If you prefer to use surface-mounted breakers, then you will need an extra ring terminal for each side of the breaker.

For the remainder of this article, we will be continuing with DIN-Rail mounted breakers. Why? Because we believe that they are better quality and they are also more affordable than good quality surface mounted breakers so that what we used, the exception being for the Inverter positive cable where we recommend a cube-style terminal fuse block due to the heavy gauge (large size) of the cabling needed for the inverter.
Finally, you’ll need a 12v Fused Distribution Panel so you can run a fuse protected positive wire to each of the 12v appliances and loads in your system. Avoid the temptation to use multiple appliances on the same fuse as it makes troubleshooting more difficult. If you do, make sure the wires can handle the projected load of all appliances turned on simultaneously (more about load calculations in our book.)

What Is The Best Way To Ground a Circuit?
Some fuse panels (like this one pictured) have an incorporated ground busbar for the negative side of the circuit. When designing your system, you can decide to bring both the positive and negative side of the circuit back to the fuse panel if you wish. The downside of this is that there over the whole system, there will be a lot of extra cables, which adds weight and cost. To circumvent this issue, in automotive applications, it is common to run only the positive side back to the fuse panel and to ground appliances to the nearest solid metal fixing on the vehicle. This turns the entire vehicle chassis into a negative busbar.
Using the vehicle chassis as a negative busbar can present some issues when troubleshooting as grounds are located all over the place. So as we discussed in Season 2 of our Van Build Series, in our installation, we decided to create small load negative busbars with a solid permanent fixing to the chassis in strategic locations near appliances. This enables us to reduce the cable length for the negative cables whilst still being able to troubleshoot in the future easily.
We go into more details about how to select the correct sized fuse and wire gauge for each part of your system in our Guide to Off-Grid Electrical Systems.
HARDWARE NEEDED FOR BATTERY INSTALLATION
| Product | Description | Quantity | Link to Item |
| Battle Born Battery | Save up for it (it’s worth it!) | 1+ | Amazon |
| Battery Terminal Fuse Block & Fuse | 1 per battery | 1+ | Amazon |
| Kill Switch | Heavy Duty | 1 | Amazon |
| Busbar | 3/8″ size | 1 pair | Amazon |
| Cable with lugs (Battery to Kill Switch) | 2/0 AWG 1 ft Red 5/16″ to 3/8″ | 1 | Amazon |
| Cable with lugs (Battery to negative bus bar ) | 2/0 AWG 1 ft Black | 1 | Amazon |
| Cable with lugs Negative bus bar to Ground) | 2/0 AWG 1 ft Black | 1 | Amazon |
| Cable with lugs (Kill Switch to Busbar) | 2/0 AWG 1 ft Red | 1 | Amazon |
| 12v Fuse Panel | For appliances | 1 | Amazon |
| Cable with lugs busbar to Fuse Panel via breaker | AWG 8 4 ft Red | 1 | Amazon |
| #10 Ring Terminal | For Fuse panel connection | 1 | Amazon |
| Breaker For Fuse Panel | 40A | 1 | Amazon |
Check Prices and Availability Of All Items On Amazon
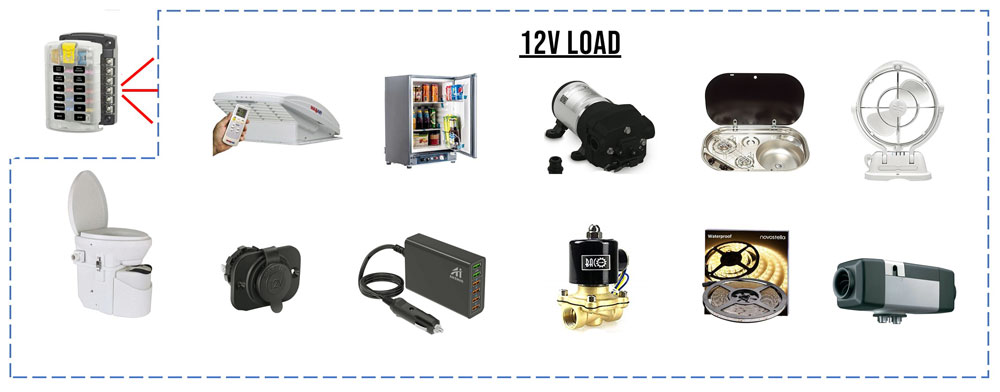
12v Appliances for Vehicle Dwelling
DC Fuse Panel
King of Off Grid Toilets
The King Available Here on Amazon
We compared your pooping options for vehicle dwelling here
Maxxfan
Available on Amazon Here
Get this model, rather than the automatic one
12V DC Sockets
Off Grid Fridge Options
12v Hub Quick Charge Power Station
Charges your devices more efficiently than via the inverter
Wall mountable
Available on Amazon Here
12v Water & Gas Solenoids
Check out our Free Guides to Van Life Water Systems & Propane Systems
Van Sink Options
12V LED Stip Light (Warm White)
Sirocco II Wall Mounted Fan
Onboard Heater
Check out Vehicle Heater Options Here
Or go with the one we have the Webasto Heater Air Top 2000 ST Webasto Air Top (it's Good)
This is an interactive Image – Click on the Items for More Information.
The majority of the loads on your system should be 12v DC. This is the most efficient way to use your system’s power as it’s already DC power and requires no inversion.
As shown in the power calculations we did earlier, the fridge is one of the heaviest draws in the vehicle, so selecting an economical fridge for van life is important. The same can be said for selecting the best heater for vehicle dwelling. We have a Webasto Gasoline heater which works great (and so it should work for the price!) it has a constant electrical draw whilst in use, but there are some heating options for van life that require no electrical power.
You’ll want to make sure you run heavier gauge wire to the 12v Power sockets and USB ports around your vehicle. A 12v power socket is likely to more future proof than a USB socket, so that is what we installed. These are rated to 120w, which is what you need. You can then install whatever the current charging tech is. We use these 12v Quick Charge Ports in our sockets. They are of high quality.
We do all of the charging for our devices via a Quick Charge USB hub. This one is wall-mounted and capable of much higher simultaneous current across the ports (quicker charging).

We liked it so much we bought another one. ?
Price and availability on Amazon
If you’re installing a fan on the roof, we recommend this Maxxfan rather than a fantastic fan which many people decide to install. The main reason is that this fan van can be used in the rain and won’t break if you leave it up whilst driving. This particular model is manual opening, which cuts down on the complexity and cost, which we like. The roof fan plays a big part in keeping down condensation (which leads to mold) and really is a must-have for a van, especially one with standing room.
If you’re visiting hot places, you should also consider installing a quality wall-mounted fan, as you’ll need that constant breeze on you for hot and humid environments.
Power Saving Tip: Use USB powered mini fans at close range whilst sleeping for an ultra, quiet, ultra low-power-draw fan. When combined with a rechargeable battery pack, these mini fans can go anywhere and are also really useful for hammocking or for starting campfires… no seriously, just try it!

Selecting the Correct Inverter for AC 120v & 230v
You will likely have some devices that require AC power and cannot be run on DC. For this, you will need an inverter.
As stated in the video, Modified Sine Wave Inverters are cheaper and should absolutely be avoided!
You must get a quality Pure Sine Wave Inverter, but what size?
To calculate the size of the invert you need, you should work out what the power consumption is of all of your AC electrical devices at the same time. In theory, that gives you the minimum size inverter you need; in practice, you can reduce this by ensuring that you don’t run all of your devices simultaneously.
AC Device | Power Draw in Watts |
| Laptop 1 | 150w |
| Laptop 2 | 65w |
| Ninja Bullet Blender | 600w |
| Van microwave | 600w |
| Induction Cooker | 1800w |
Example power consumption of typical van life AC appliances
(Important: power usage varies between devices, check yours for exact numbers)
For most people, like us, a 1000W PSW inverter will be enough. We can run our laptops, charge an electric razor, and make a smoothie simultaneously. Heck, we can even run some power tools.
If you have a high power microwave or an induction cooker, then a 2000W inverter will be necessary. Of course, larger inverters are available if you plan on running huge AC units or van electric furnaces or maybe welding out the back of your rig ? , But most people don’t need to go this big.
CHOOSE YOUR INVERTER SIZE
Inverter Section
(Best Value Pure Sign Wave Inverters)
| Make | Inverter Size | Output Voltage | Link to Item | DC Fuse Size | Cable Size |
| Samlex | 300w | 120v or 230V | Amazon | 40A | AWG #8 |
| Samlex | 600w | 120V or 230V | Amazon | 80A | AWG #6 |
| AIMS | 1000w | 120V or 230V | Amazon | 125A | AWG #1/0 |
| Samlex | 1500w | 120V | Amazon | 200A | AWG #1/0 |
| Samlex | 2000w | 120V | Amazon | 250A | AWG #2/0 |
| AIMS | 3000w | 120V or 230V | Amazon | 375A | AWG #4/0 |
Is an Inverter Charger Really A Good Idea for Van Life?

An inverter charger does the job of both the inverter and a shore-power smart charger so that you can charge whilst hooked up to the grid.
The advantage is that you only have to install one device, which might save you some space and look tidier. Some also have a transfer switch, which will allow you to switch compatible appliances automatically (e.g., fridges & furnaces) over automatically between on-grid and on-board AC.
They are a little pricey, though, and the biggest downside for us is that it’s a single point of failure. There is some advantage to creating a modular system with each device doing a dedicated job; we think it’s better for nomads and overlanders, so that is what we did.
If you like the combo option (many do), here are the best options available for your budget.
CHOOSE YOUR INVERTER CHARGER
| Make | Inverter Size | Quality | Link to Item |
| Renogy | 1000W – 3000W | Budget | Amazon |
| AIMS | 1250W | Value | Amazon |
| Victron Energy | 2000W – 3000W | High End | Amazon |
On-board AC Accessories
From the inverter, we connect into an AC Junction Box to connect to various AC sockets around the vehicle; we find that to be more convenient. If you have a high load, it is advisable to split the load over the inverter output sockets. As our loads are not high, we have it plugged into one inverter outlet with the other one as a spare.
We keep all of our AC wiring separate in the system, and the breakers housed in a separate mini power breaker enclosure. Unlike our DC breakers, we don’t want to accidentally get fingers getting into the AC Live wires.
If you don’t want to wire in power sockets, you can keep it simple and connect directly to a multi-power socket. We have the international kind which accepts any type of plug top. Recommended for our international traveling friends.
For convenience, you may wish to install sockets at designated locations around your vehicle.
 |
If you are traveling to international locations or might use international appliances, we recommend installing a Universal Type Power Socket.

HARDWARE NEEDED FOR INVERTER SET UP
| Product | Description | Quantity | Link to Item |
| AIMS 1000W Inverter | Pure Sine Wave | 1 | Amazon |
| Inverter Remote Control | Optional | 1 | Amazon |
| Cable | 1/0 AWG Red & Black (Pair) 3/8 Lug 2ft | 1 | Amazon |
| Breaker | AC Side 16A | 1 | Amazon |
| Battery Terminal Fuse Block & Fuse | 125A (based on 1000W inverter) | 1 | Amazon |
| AC Junction Box | For splitting to multiple sockets | 1 | Amazon |
| Universal AC Power Socket | with USB ports | 1+ | Amazon |
| AC Breaker Housing | Important | 1 | Amazon |
| Heavy-Duty AC Cable | Optional (for the inverter output socket) | 1 | Amazon |
Check Prices and Availability Of All Items On Amazon
Mobile Power Expansion Pack
(for Weekend Warriors and Part-Time Nomads)
Whilst we’re talking about designing the ‘ultimate mobile off-grid power system,’ let us not forget the keyword in this phrase, “mobile”!
Taking advantage of Lithium technology is a must for weekend warriors and part-time nomads. However, nobody said all that investment needs to stay in the van!
There is a huge advantage to being able to move this Lithium powered silent generator in and out of your vehicle as your lifestyle demands. If you think you could benefit from having part of your power system portable, so you can bring power to the beach, camping, or on-site with your work, then perhaps a Silent Generator could be what you need.
Entry-level silent generators for under $500 do exist; the high-end all-in-one options get pricey.

Top of the range silent generator. Prepare yourself for the price on Amazon.
12v Battery Charging Systems For Van Life
A Van Tour of our Off-Grid Electrical System
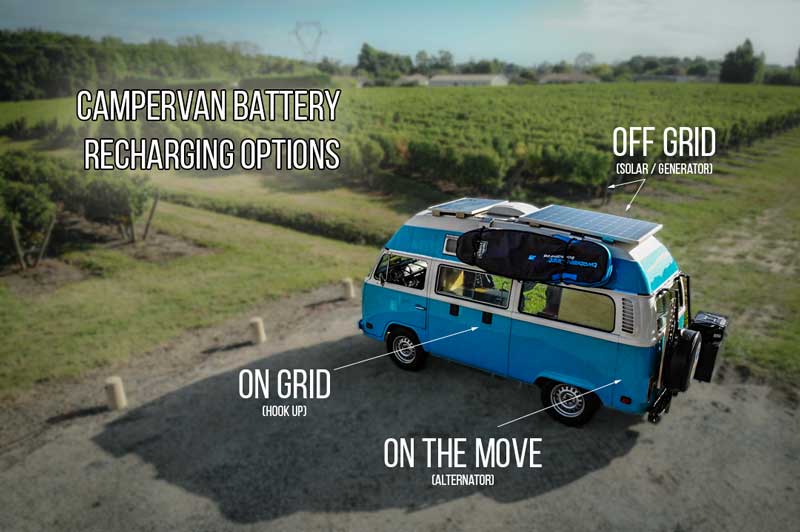
How you get power back into your 12v battery system is arguable more important than how you drain it. There are various ways to recharge your battery bank; the best option will depend on your lifestyle. Do you spend a lot of time driving? Will you have regular access to power hook-ups? Will your solar harvest be limited by your geographical location?
The best, most complete, and most versatile solution is to tackle the task of recharging your battery bank from 3 angles On-Grid, Off-Grid & On The Move!
Solar & Recharging Your Batteries Whilst Off-Grid
(and living the dream!)

Solar Panels are a smart option for almost every campervan, but particularly so if you spend multiple days off-grid and you have a constant drain on your system, like a fridge, for example.
Calculating How Much Solar You Need for Van Life
There are 3 approaches to calculating how much solar you will need for Van Life.
Option 1 – The Minimalist
If you have minimal power requirements and a small battery bank, then you can install a single panel to maintain your battery (keeping it topped up).
Option 2 – The Maximalist
If you have a large battery bank, a mid to small-sized rig, and high power requirements, you are likely to be limited by the size of your roof, so the best option for you is to install as many panels as you can fit, according to your vehicle’s roof real-estate. Either way, it’s still worthwhile doing the calculations so you can understand how feasible off-grid living is with your power system.
Option 3 – The Realist
Many people will fit between options 1 and 2 and will want to keep costs down by only installing enough solar panels to meet the power needs of their lifestyle. This is how much average power you can expect to gain from a solar panel.
Solar Panel Array Size | Daily Average Harvest (in Ah) |
| 100W | 25a |
| 175W | 44a |
| 200W | 50a |
| 300W | 75a |
| 500W | 125a |
From the table above, we see that we harvest, on average, 1 Ah per 4W of solar.
Keep in mind that these figures are approximate as the real values are significantly impacted by geographical location, season, and shading. These are average figures considering that we harvest more solar power in the summer than in the winter.
To calculate the size of Solar Array that you need, you must take the power consumption that you calculated earlier than work out how many amps you need to harvest to meet your daily power usage.
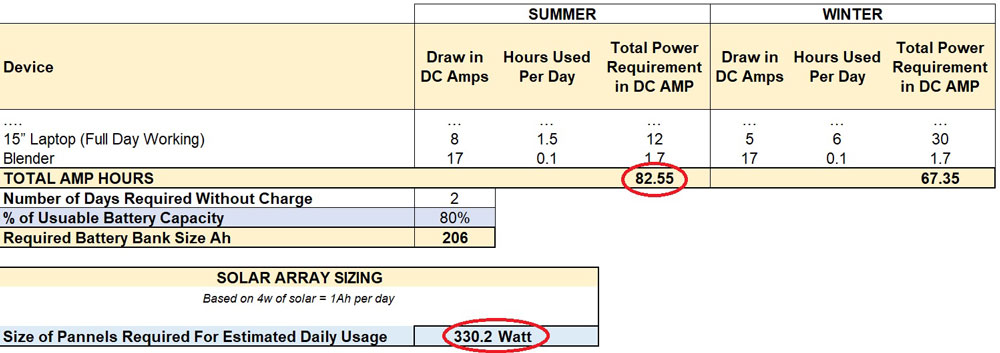
82.55 Ah X 4W/Ah = 330W of solar
- If you spend a lot of time at high latitudes or will be off-grid winter camping in Dec / Jan, then increase this by approximately 25%
- If you spend a lot of time chasing the sun and expect to have access to clear sunny skies, you can reduce this by up to 25%
DOWNLOAD YOUR POWER CALCULATION & SOLAR ARRAY SIZING TOOL HERE
Real-Life Situation
The values here show how much solar you need on average to maintain your daily power consumption whilst camping off-grid and not moving. Keep in mind that if you have frequent access to the other 2 charging options (discussed below), then you can reduce your Solar Panel Array size further.
Rigid Solar Panels vs. Flexible Solar Panels for Van Life
What type of panels are best for Van Life?
Flexible solar panels have the advantage of being more stealthy and lightweight. They do not last as long or perform as well as rigid panels.
Rigid solar panels are heavier but have the advantage of providing shade inside the vehicle, can be tilted for increased versatility; they last longer and perform better.

CHOOSE YOUR FLEXIBLE SOLAR PANELS
| Make | Panel Size | Link to Item |
| Renogy | 50W – 160W | Amazon |
| WindyNation | 100W – 600W | Amazon |
CHOOSE YOUR RIGID SOLAR PANELS
(we recommend ridged panels for Overlanding)
| Make | Panel Size | Link to Item |
| Renogy | 100W – 600W | Amazon |
| Newpowa | 150W – 200W | Amazon |
Solar Charge Controller
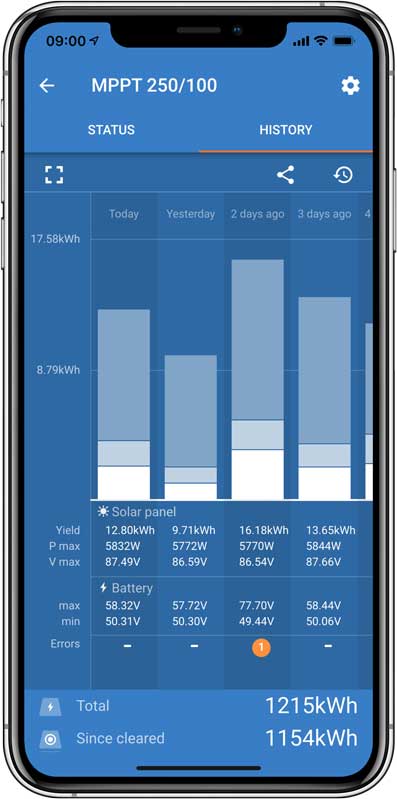
You’ll need a solar charge controller to get the solar panels’ energy into your battery bank in the most efficient way. We use a Victron Energy Solar Charge Controller. It does a fantastic job and lets us see our historical solar harvest on our smartphone via their app. Great for Off-Grid geeks like us ?
CHOOSE YOUR SOLAR CHARGE CONTROLLER
| Total Solar Array Power Output | Solar Charge Controller (click to see on Amazon) | DC Breaker Size (Click to see on Amazon) |
| 0 – 220W | 75|15 | 20a |
| 221 – 440W | 100|30 | 40a |
| 441 – 700W | 100|50 | 60a |
| 701 – 1000W | 150|70 | 80a |
HARDWARE NEEDED FOR SOLAR SET UP
| Product | Description | Quantity | Link to Item |
| DC Breaker | one each side of the charge controller | 2 | Amazon |
| Roof Entry Gland | Waterproof | 1 | Amazon |
| Branch Connector | Optional – 1 x Required for each 2 panels in Parallel | 1+ | Amazon |
| 8 AWG Solar Cable | 15 – 30ft | 1 pair | Amazon |
| Cable Lugs & Heat Shrink | 8AWG 3/8″ ring for busbar | 2 | Amazon |
| High-Quality Monocrystalline Solar Panel | 100W Each 41.6×20.7×1.38 in Weight: 14.3 lbs | 2 | Amazon |
| Solar Charge Controller | Victron MPPT 100|30 | 1 | Amazon |
Check Prices and Availability Of All Items On Amazon
When Solar is not enough, and you don’t want to drive anywhere, your only option is this guy.

Unlimited power is available on Amazon.
Recharging Your Batteries Whilst Driving

The major benefit of being able to recharge whilst driving is that you can reduce the overall size of your battery bank, and you are more independent if you are unable to recharge from solar due to bad weather.
Providing your alternator has enough spare power after running your vehicle’s primary systems (wipers etc.) and engine, then you can harness the excess power from your alternator to recharge your battery bank whilst the engine is running. Budget options for this do exist, but they are not ideal and will fail to get you 100% SOC (State of Charge) and are really only viable for the most budget conscious van lifers.
We installed a Sterling Power Batter-to-Batter Charger, which does a fantastic job of providing the exact charge profile required by any battery chemistry so that batteries are recharged as quickly and efficiently as possible. In fact, the B2B can recharge the batteries between 5 – 20 times faster than a stand-alone alternator.
It doesn’t affect the primary engine battery and helps the alternator last longer by not overworking it. It’s a great piece of kit.
If you have a modern vehicle with a power-saving alternator, you need a device like this B2B; otherwise, your alternator will not put out sufficient voltage to charge your battery bank.
Still, think you can get away with the cheaper VSR option? Watch this handy video first to be sure.
VSR vs. Battery to Battery Chargers
CHOOSE YOUR BATTERY TO BATTERY CHARGER
To select the correct size Battery to Battery charger, you need to work out how much spare power your alternator has after running the vehicle (“hey google”). Then you need to check your battery spec sheet to see what the maximum charge rate is.
For Battle Born Batteries, the recommended maximum charge rate is 50A for each battery wired in parallel. For AGM, it’s 20% of the battery capacity.
We chose the 30A model because our alternator is tiny. 60A or 70A is the best option for most people.
| Total Solar Array Power Output | Solar Charge Controller (click to see on Amazon) | DC Breaker Size (Click to see on Amazon) |
| 30A | Amazon | 40A |
| 60A | Amazon | 63A |
| 70A | Amazon | 80A Surface or 80A DIN |
HARDWARE NEEDED FOR ALTERNATOR CHARGING
| Product | Description | Quantity | Link to Item |
| DC Breaker | one each side of Batter to Battery Charger | 2 | Amazon |
| Cable | Red & Black AWG 6 | 1 | Amazon |
| Sterling Power Batter to Battery Charger | 60A | 1 | Amazon |
| Cable Lugs & Heat Shrink | 6 AWG 3/8″ rings for busbar | 2 | Amazon |
Check Prices and Availability Of All Items On Amazon
Shore Power Hook Up For Campervans
(On-Grid Charging)
Sterling Power Global Smart Charger on Amazon

- 5 years warranty
- Power Factor Corrected – 0.99pfc – 91% efficient
- 3 Output – 40A 12V. Input – 90V – 270VAC input / 48Hz – 70Hz – GLOBAL INPUT
- 11 Pre-programmable settings – AGM, Gel, flooded, sealed, LiFePO4
- You can also customize your charging profile if you wish.
You need a dedicated smart charger if you want to spend time hooked up to the grid. It’s a nice option to have because sometimes you don’t want to drive, and the weather isn’t good enough to charge your battery bank from the solar alone. It’s also useful to be able to hook up to a friend or relatives’ place when you are visiting, top up the batteries and stop worrying about parking under that tree!
Sizing your shore power is similar to sizing your alternator Battery to Battery charger, 50% of the battery capacity for Lithium-Ion Phosphate, and 20% for AGM. Be sure to double-check the numbers on your battery spec sheet for your specific battery.
Sterling Power again makes a fantastic unit with not only the correct multi-stage charging profile for any battery type but also it accepts either 120V or 230V, which is especially useful for us international overlanders!
We opted for the 40A model as it was the largest amperage with the smallest physical footprint. If you have space and your battery bank can handle it, get the 60A model for faster charging times.
CHOOSE YOUR BATTERY SMART CHARGER
| Sterling ProCharge Ultra | Link to Item | DC Breaker Size (Click to see on Amazon) |
| 10A | Amazon | 15A |
| 20A | Amazon | 25A |
| 30A | Amazon | 32A |
| 40A | Amazon | 50A |
| 50A | Amazon | 60A |
| 60A | Amazon | 63A |
HARDWARE NEEDED FOR SMART CHARGER
| Product | Description | Quantity | Link to Item |
| Breaker | DC Side | 1 | Amazon |
| Breaker | AC Side | 1 | Amazon |
| Cable | 3 ft Red, 3 ft Black 6 AGW | 1 | Amazon |
| Cable (Hook up to Smart Charger) (you can remove the ends, they’re not needed) | 12 ft 3 core, 12 AGW | 1 | Amazon |
| Cable Lugs & Heat Shrink | 6 AWG 3/8″ for busbar | 2 | Amazon |
| AC Breaker Housing | Important (can be shared with inverter) | 1 | Amazon |
| AC Hook-Up Socket | For the outside of the vehicle | 1 | North America |
| AC Hook-up Cable | For Campsites | 1 | North America |
Sterling Power ProCharge Ultra | Global Smart Charger | 1 | Amazon |
Check Prices & Availability Of All Items On Amazon
STEALTH CAMPING SMART CHARGER OPTION

If you don’t want to have hook up ports on the side of your vehicle, but you still want the option of ‘shore power,’ then we can personally recommend the NOCO Genius 26000.
It can remain wired to your battery, and you can simply run an extension cord through the window and plug the unit in when you need power. It does the same job and is more portable than an installed Smart Charger. It’s not as convenient, however, nor as powerful.
How to Properly Monitor You Off-Grid Electrical System

The more you have invested in your off-grid mobile power system, the more important it is to accurately track your State of Charge (SOC) so that you don’t over-work your system, and you get a good return on your investment from your batteries.
As mentioned in the video, a standard voltmeter is a terribly inaccurate way of monitoring your SOC. For Lithium Batteries, reading the SOC with voltmeter does not work the same way, and it’s rather complicated to read.
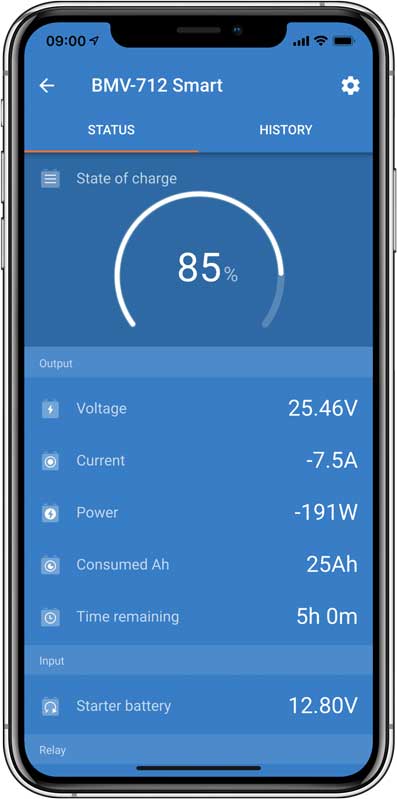
For serious Off-Grid folk and to protect your investment, it is necessary to get a Battery Shunt to measure each amp that enters and leaves your system.
We installed the Victron Energy Battery Monitor, and we enjoy the statistics that we see on our phone from the App. This device plays a big and important role in how we manage to live and work off-grid and on the move.
HARDWARE NEEDED FOR BATTERY MONITOR
| Product | Description | Quantity | Link to Item |
| Negative Busbar | 3/8″ size (If you haven’t already got one) | 1 | Amazon |
| Victron Power Battery Monitor | BMV-712 | 1 | Amazon |
| Cable with lugs Negative bus bar to Ground | 2/0 AWG 1 ft Black | 1 | Amazon |
Check Prices and Availability Of All Items On Amazon
Complete Electrical System Materials List
1 – BATTERY BANK PARTS LIST
| Product | Description | Quantity | Link to Item |
| Battle Born Battery | Save up for it (it’s worth it!) | 1+ | Amazon Discounted Battle Born Batteries Available Here Kombi Crew Members Save an additional $80 here |
| Battery Terminal Fuse Block & Fuse | 1 per battery | 1+ | Amazon |
| Kill Switch | Heavy Duty | 1 | Amazon |
| Busbar | 3/8″ size | 1 pair | Amazon |
| Cable with lugs (Battery to Kill Switch) | 2/0 AWG 1 ft Red 5/16″ to 3/8″ | 1 | Amazon |
| Cable with lugs (Battery to negative bus bar ) | 2/0 AWG 1 ft Black | 1 | Amazon |
| Cable with lugs Negative bus bar to Ground) | 2/0 AWG 1 ft Black | 1 | Amazon |
| Cable with lugs (Kill Switch to Busbar) | 2/0 AWG 1 ft Red | 1 | Amazon |
| 12v Fuse Panel | For appliances | 1 | Amazon |
| Cable with lugs busbar to Fuse Panel via breaker | AWG 8 4 ft Red | 1 | Amazon |
| #10 Ring Terminal | For Fuse panel connection | 1 | Amazon |
| Breaker For Fuse Panel | 40A | 1 | Amazon |
Add All To Your Amazon Shopping List
2 – INVERTER PARTS LIST
| Product | Description | Quantity | Link to Item |
| AIMS1000W Inverter | Pure Sine Wave | 1 | Amazon |
| Inverter Remote Control | Optional | 1 | Amazon |
| Cable | 1/0 AWG Red & Black (Pair) 3/8 Lug 2ft | 1 | Amazon |
| Breaker | AC Side 16A | 1 | Amazon |
| Battery Terminal Fuse Block & Fuse | 125A (based on 1000W inverter) | 1 | Amazon |
| AC Junction Box | For splitting to multiple sockets | 1 | Amazon |
| Universal AC Power Socket | with USB ports | 1+ | Amazon |
| AC Breaker Housing | Important | 1 | Amazon |
| Heavy-Duty AC Cable | Optional | 1 | Amazon |
Add All To Your Amazon Shopping List
3 – SOLAR PARTS LIST
OFF-GRID CHARGING
| Product | Description | Quantity | Link to Item |
| DC Breaker | one each side of the charge controller | 2 | Amazon |
| Roof Entry Gland | Waterproof | 1 | Amazon |
| Branch Connector | Optional – 1 x Required for each 2 panels in Parallel | 1+ | Amazon |
| 8 AWG Solar Cable | 15 – 30ft | 1 pair | Amazon |
| Cable Lugs & Heat Shrink | 8AWG 3/8″ ring for busbar | 2 | Amazon |
| High-Quality Monocrystalline Solar Panel | 100W Each 41.6×20.7×1.38 in Weight: 14.3 lbs | 2 | Amazon |
| Solar Charge Controller | Victron MPPT 100|30 | 1 | Amazon |
Add All To Your Amazon Shopping List
4- ALTERNATOR CHARGING PARTS LIST
ON THE MOVE CHARGING
| Product | Description | Quantity | Link to Item |
| DC Breaker | one each side of Batter to Battery Charger | 2 | Amazon |
| Cable | Red & Black AWG 6 | 1 | Amazon |
| Sterling Power Batter to Battery Charger | 60A | 1 | Amazon |
| Cable Lugs & Heat Shrink | 6 AWG 3/8″ rings for busbar | 2 | Amazon |
Add All Items To Your Amazon Shopping List
5 – AC HOOKUP PARTS LIST
ON GRID CHARGING
| Product | Description | Quantity | Link to Item |
| Breaker | DC Side | 1 | Amazon |
| Breaker | AC Side | 1 | Amazon |
| Cable | 3 ft Red, 3 ft Black 6 AGW | 1 | Amazon |
| Cable (Hook up to Smart Charger) (you can remove the ends, they’re not needed) | 12 ft 3 core, 12 AGW | 1 | Amazon |
| Cable Lugs & Heat Shrink | 6 AWG 3/8″ for busbar | 2 | Amazon |
| AC Breaker Housing | Important (can be shared with inverter) | 1 | Amazon |
| AC Hook-Up Socket | For the outside of the vehicle | 1 | Amazon |
| AC Hook-up Cable | For Campsites | 1 | Amazon |
Sterling Power ProCharge Ultra | Global Smart Charger | 1 | Amazon |
Click To Add To Your Amazon Shopping List
6 – BATTERY MONITORING PARTS LIST
| Product | Description | Quantity | Link to Item |
| Negative Busbar | 3/8″ size If you haven’t already got one | 1 | Amazon |
| Victron Power Battery Monitor | BMV-712 | 1 | Amazon |
| Cable with lugs Negative bus bar to Ground | 2/0 AWG 1 ft Black | 1 | Amazon |
Add All To Your Amazon Shopping List
7 – ADDITIONAL HARDWARE REQUIRED FOR ELECTRICAL SYSTEM
Wire lengths to be adjusted to for your vehicle
| Product | Description | Quantity | Link to Item |
| Heat Shrink Kit | For protection after crimping | 1 | Amazon |
| Fuse Kit | Various Sizes | 1 | Amazon |
| 14 AWG Red | Positive Loads | 100ft | Amazon |
| 14 AWG Black | Negative Loads | 100ft | Amazon |
| 12 AWG Red | 12v Sockets Positive | 25ft | Amazon |
| 12 AWG Black | 12v Socket Negative | 25ft | Amazon |
| 16 AWG Duplex | Low loads & LED Lighting | 100ft | Amazon |
| DIN Rail | For DC Breakers | 1 | Amazon |
| Terminals Variety Pack | For various applications | 1 | Amazon |
| Cable Trunking | For larger Cable Looms | 1 | Amazon |
| Flexible Conduit (Spit Loom)20ft 1/2″ | To protect Wiring Looms | 1 | Amazon |
| Flexible Conduit (Spit Loom)20ft 1″ | To protect Wiring Looms | 1 | Amazon |
| Flexible Conduit (Spit Loom)20ft 3/8″ | To protect Wiring Looms | 1 | Amazon |
| Cable Clamp Kit | To secure Wiring Looms to Vehicle | 1 | Amazon |
| Zip Tie Kit | Various Sizes | 1 | Amazon |
| Rubber Grommet Kit | Various Sizes Protects cables passing through metal | 1 | Amazon |
| Negative Bus bar | For smaller loads | 1+ | Amazon |
| Anti Vibration Rubber Mounts | To protect sensitive Electrical Components (charge controllers etc.) | 20 pack | Amazon |
Add All To Your Amazon Shopping List
8 – 12V Loads / Appliances
Choose the ones you’ll need
| Product | Description | Quantity | Link to Item |
| MaxFann | 5100K | 1 | Amazon |
| 12v Fridge | Also works on 110V and LPG Fridge Selection | 1 | Amazon |
| 12v Water Pump | Shurflo 3 GPM | 1 | Amazon |
| Campervan Stove & Oven | 17″ high, 20 1/4″ wide, 19″ deep. | 1 | Amazon |
| Wall Mounted Fan | Sirocco II | Amazon | |
| Off-Grid Composting Toilet | Nature Head | 1 | Amazon |
| 12v Socket | High Power | 2 | Amazon |
| 12v Socket Quick Charge Port | Fast Charge | 2 | Amazon |
12v Charging Station | Wall Mounted Fast Charge Multiple Devices | 1 | Amazon |
Induction Stove | 2 Burner (if not cooking on propane) | 1 | Amazon |
600W Microwave | Small For Van Life | 1 | Amazon |
Blender | Ninja Bullet | 1 | Amazon |
USB Powered Mini Fan | Low Voltage / Low Power & Portable | 1 | Amazon |
UV Water Filtration System (highly recommended) | See our Water System Guide Here | 1 | Amazon |
Tiny House Heater | Choose your fuel | 1 | Propane Powered Gasoline Powered Diesel Powered Electric Powered |
12v LED Strip Light | Customizable length | 1 | Amazon |
12v Compressor | High Output ARB for airing up after off-roading | 1 | Amazon |
12v Dimmer | For LED Lights | 1 | Amazon |
LED Light Recessed | If you don’t want to use Strip lights | 4 pack | Amazon |
9 – Required Tools
Good connections are essential. For safety reasons, use the proper tools for the job.
| Product | Description | Quantity | Buy Link |
| Wire Crimp Tool | Double Crimp & Ratcheting (ensures proper connections) | 1 | Amazon |
| Wire Stripping Tool | Cuts and strips 10 – 22 AWG | 1 | Amazon |
| Heavy Duty Cable Cutters | For cutting up to 4/0 AWG | 1 | Amazon |
| Heavy Duty Crimping Tool 12 – 2/0 AWG | Require if making your own cable lugs | `1 | Amazon |
| Hot Air Gun Variable Temperature | For Heat shrink and other projects | 1 | Amazon |
| Portable Label Maker | For a professional installation (optional) | 1 | Amazon |
| 12 Trouble Shooting Light | for fast troubleshooting | 1 | Amazon |
| Multimeter with Non-Contact Ammeter | very useful for troubleshooting and checking charge and current flow | 1 | Amazon |
| Off-Grid Soldering Iron | Butane powered (doesn’t need electricity) | 1 | Amazon |
DOWNLOAD YOUR WIRING DIAGRAM
Download your Wiring Diagram & Comprehensive Step-by-Step Build Tutorial
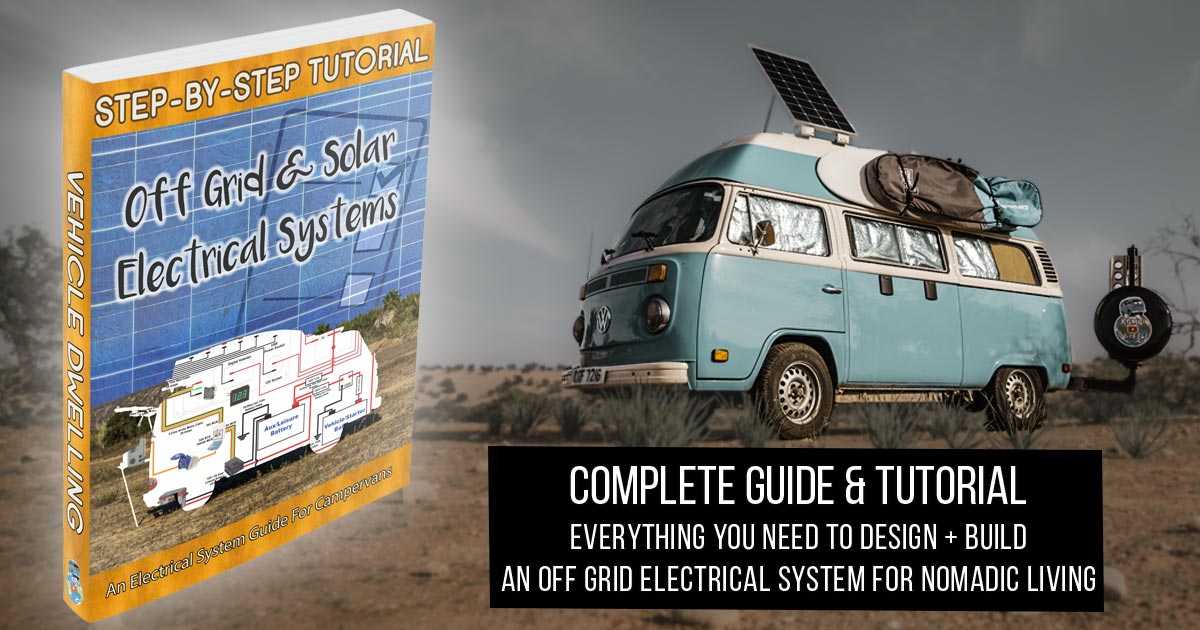
We’ve spent hundreds of hours researching this subject and have condensed all the information into this essential time-saving package.
This guide provides you with everything you need to build your own Off-Grid Electrical System –
Get your Complete Guide Package Here