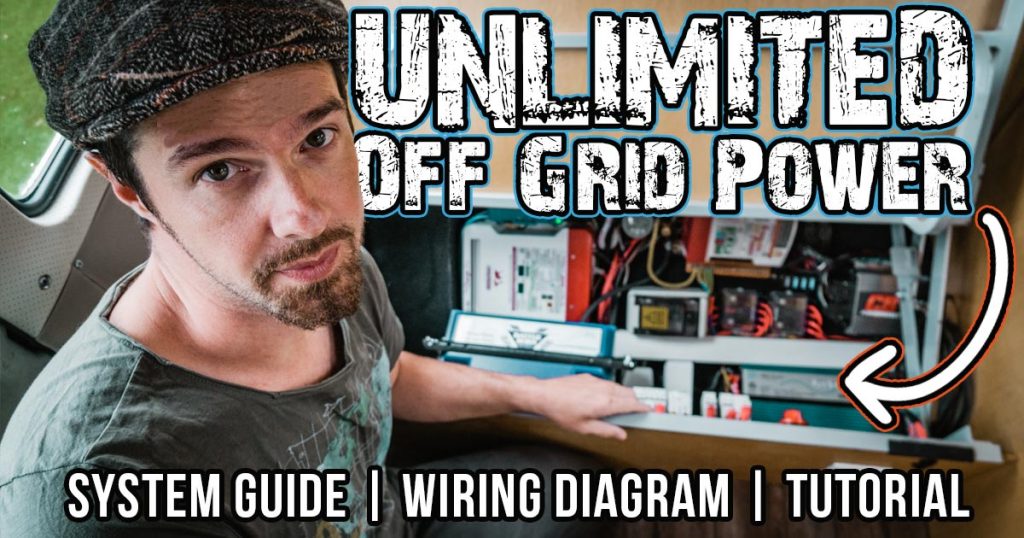
Van Propane Systems for Self-Built Campervans
A Van Propane System is a requirement for most people who are living the van life. Like many people, we use Propane as a main fuel source as it contains an enormous amount of energy and is extremely efficient. It is possible to obtain near-unlimited off-grid power if you know how to build an efficient solar electrical system, but even then you may still want to combine your 12v power with a propane system so you can build a more versatile adventure vehicle. A good Overlanding vehicle leverages multiple power sources for both efficiency and redundancy reasons.
In this video & post, we’re running you through how we installed our propane system in our DIY Campervan Conversion for our Overland Around The World Expedition.
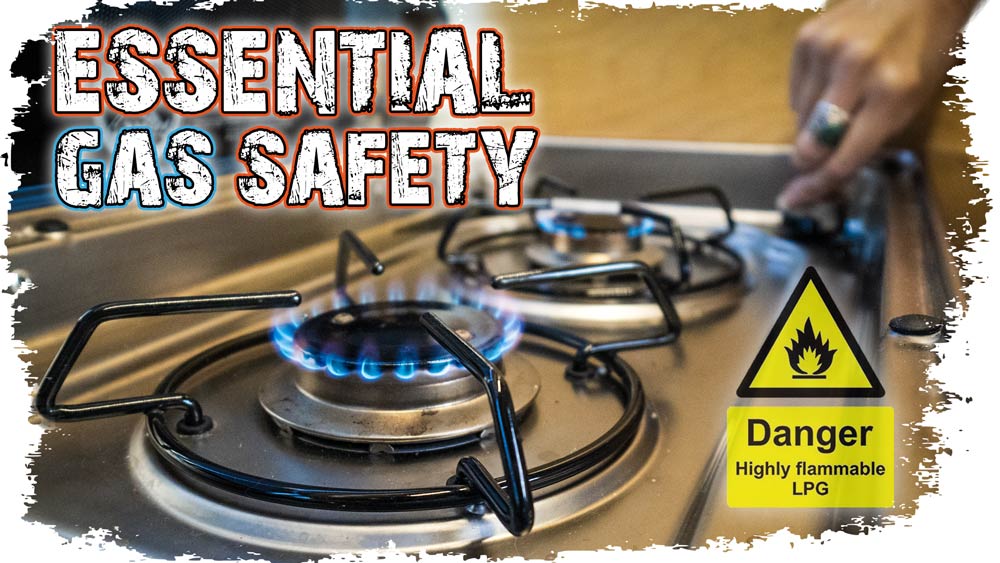
We both know that propane is no joke and that it should be installed in the safest way possible as the consequences can be fatal. In some places (like Australia) it’s illegal to do your own propane system work, so please check the laws where you are before you carry out any work on your vehicle.
If you are in any doubt about what you are doing we recommend that you hire a professional to do your propane work for you. At the very least, consider having a professional check your installation when you are done.
DISCLOSURE: This post contains affiliate links, which means that if you click a product link and buy anything from the merchant, we will receive a commission fee. The price you pay remains the same with or without the affiliate link
Complete Guide to Van Life Propane / LPG / Gas Systems
Propane Cylinders / Tanks For Mobile Living
There are only 2 serious options for propane tanks for mobile living. Vertical Gas Cylinders are most typically found in 20lb but are also available in smaller 5LB and 11LB configurations if space is an issue. Vertical cylinders must not be installed horizontally and they have the obvious disadvantage of taking up your living space if they are installed inside your vehicle.

If you’re going for this configuration then these cylinders should be installed in a propane locker which is sealed to the inside of the vehicle but vented to the outside, otherwise, they should be installed outside your vehicle.
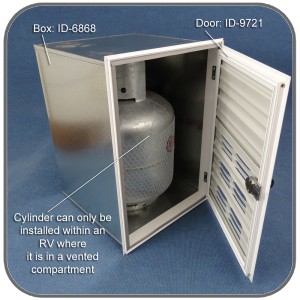
In many places this is a requirement by law, in the Americas, the laws are more relaxed and you often see people putting a propane tank inside the living area without any ventilation. This is seriously dangerous!
Whilst driving The Pan-American Highway on the Hasta Alaska Expedition we had leaks on multiple occasions due to vibration and also different failing parts – over time this will happen!
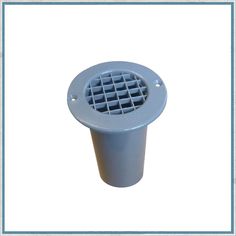
The best way to protect yourself is with a sealed propane locker, but the least you should do is have a drop vent under your propane cylinder for leaking gases to escape.
Propane is heavier than air so it will naturally fall downwards towards the drop vent.
In North America, it is very easy to find a filling station for propane but in Europe, they work on an exchange system with each country having different (non-compatible) gas cylinders.
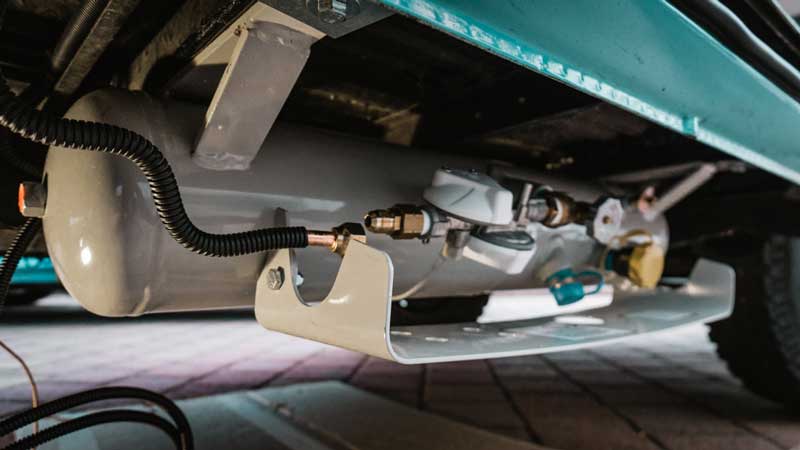
For this reason whilst we were building our Kombi “Boomerang” we opted for a horizontally mounted under-slung propane tank that we got from GoWesty.

The advantage of the under-slung propane tank is that it frees up precious living space inside the vehicle. The downside is that you might lose some ground clearance in that location which is not ideal if you will be off-roading. When GoWesty is building a vehicle for off-roading they typically remove the under-slung tank and we thought twice about adding one ourselves. However, for long-distance travelers like us an under-slung tank is ideal because we don’t need to worry about exchanging tanks as we travel to different countries and we can find fill-up locations at many standard AutoGas fuel stations. It also lasts a very long time which helps us make it through regions where propane isn’t available. We use the myLPG.eu app for finding this location in Europe. If you are traveling through Europe and you intend to fill your propane tanks then you will need to have a gas adapter kit for this purpose.

Propane Cylinder Wireless Level
It’s no fun running out of propane mid-shower or halfway through cooking your spaghetti bolognese. We recommend installing a propane level gauge if you want to know how much propane you have left in your system. This one is wireless which makes the installation process much easier.

Propane & Gas Regulators
To make sure your propane is delivered at a constant 11 WC (around 28mBar) for your appliances, the propane pressure must be regulated with an appropriately named regulator
Single Stage Regulator

Dual Stage Regulator

A 2 stage regulator isn’t strictly necessary unless your appliances demand it. The first stage reduced the pressure to 10 psi the 2nd stage maintains 11 W.C and they are said to be better at maintaining a consistent gas pressure with temperature changes and dropping propane levels. We have installed this 2 Stage Regulator for our system and it works perfectly. You will need to ensure you have a 2 stage regulator cover, especially if this is installed outside
You can of course get away with no regulator at all if you are connecting directly to a device that has an inbuilt propane regulator and is designed to be used with the disposable 1lb propane bottles gas stove or a tiny house heater like the Mr.Buddy Heater – but any other application requires a regulator as pictured above
Propane Solenoid
A Propane Solenoid is not 100% necessary but we are really pleased that we installed it in our van. The device allows us to choose when propane is sent to the appliances at the push of a button. We feel much better knowing that propane can’t leak into our house unless we have it activated.
A propane solenoid should be installed as close to the regulator as possible on the low-pressure side. It should be NC (Normally Closed), 12v (if that is what your system is), and weatherproof if installed outside of the vehicle. You should also make sure that it is big enough to allow sufficient propane through for your system demands.

Whilst we’re on the subject of safety – be sure to install a carbon monoxide detector!

Propane Gas Pipes & Hoses
To get propane from your tank to your appliances you will need to route pipes and hoses.
As tempting as it may be, rubber hoses should be avoided for propane if at all possible and certainly not run underneath the vehicle. Rubber hoses degrade over time, rodents like to eat them and they are just not as safe as copper pipes. We only use rubber hose for the final connections to our appliances as it makes access for maintenance easier
If you really want to install the gas lines in the best and safest way possible, let’s see how the Australians do it – they have the highest standards we’ve ever come across, we’ll let you decide if this is overkill for your situation.
AUSTRALIAN HIGH STANDARD PROPANE PIPE INSTALLATIONS
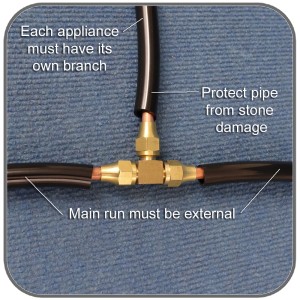
The copper pipe must be located where it is not likely to suffer physical damage. If damage is likely, the pipe must be protected. A suitable method to prevent stone damage is to protect it within a hose or pipe. The location must also ensure it cannot be damaged.
Where more than one appliance is to be installed, the main run of copper pipe shall be located outside the vehicle.
Each appliance shall have its own branch pipe.
Each branch pipe will enter the interior of the vehicle adjacent to the appliance.
Where a flexible hose is connected to an appliance, it shall not exceed 1200mm (about 4ft)
Joins and junctions are not permitted within a sleeping area (or engine compartment).
Joins and junctions must be readily accessible for future maintenance.
There can be no joins between the main run and a shut-off valve on a branch to an appliance.
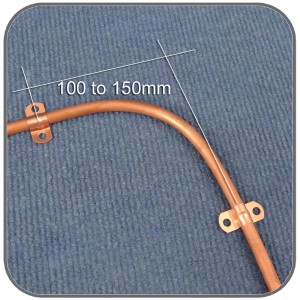
The pipe must be supported at least every 600mm in a horizontal run by non-ferrous metal clips. A maximum of 1250mm for vertical runs and
a max of 150mm on each side of a change in direction.
We used a 3/8″ copper pipe for our system. 5/16″ is used by some people but a 3/8″ pipe is recommended for larger propane systems (and longer vehicles) so we installed 3/8″ to make our system future-proof for possible expansion.

We used these stainless steel pipe clamps to prevent any issues of abrasion on the soft copper and to protect the pipes, and we used standard Electrical Flexible Conduit to protect the pipe where it was running under the vehicle.

Connections Without Leaks
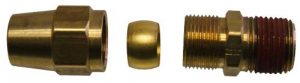
Copper pipe is used for propane gas all over the world, but how the connections are done differs. In North America and Australia, flare fittings are used, and flare fittings are said to be better at handling the vibrations of a mobile propane system so we used flare fittings in our system and we suggest you do too.
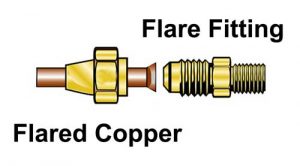
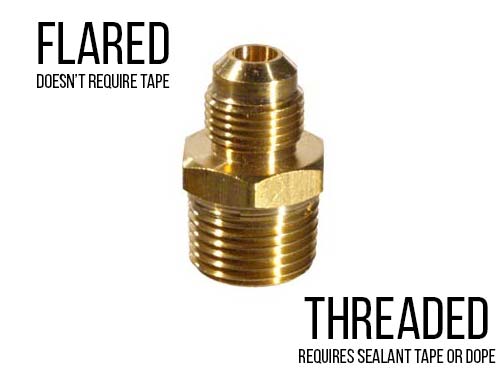
Flared fittings also do not require any sealant as the gas-tight seal is made with the flared copper pipe compressing into the chamfered edge of the brass fitting.
You will, however, need to seal the threaded connections, which may occur in some parts of your system for example on the solenoid, regulator, or some valves. On these threaded connections, you will need to use the thicker gas-approved YELLOW PTFE Teflon tape, not the white one which is meant for water.

You can also use Pipe Dope, which is liquid PTFE. Many professionals will use both tape and liquid together and this is the method that worked best for us too.
To make a leak-free connection, first put the flare nut onto the copper pipe first. In case you didn’t hear me, I said PUT THE FLARE NUT ONTO THE COPPER PIPE FIRST!?

Then use the flaring tool shown below (this is the flaring tool here on Amazon) to flare the end of your copper pipe. It’s quite easy to do.
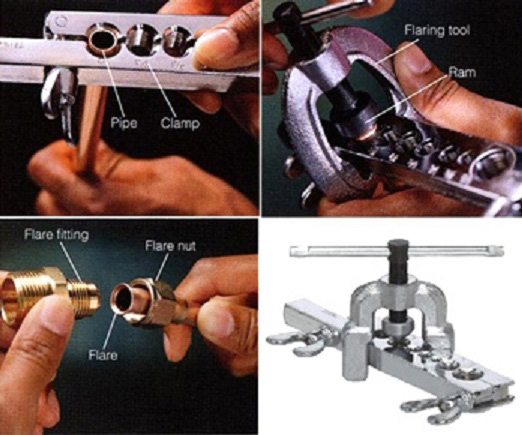
To cut the copper pipe to the size you really need to use a pipe cutting tool like the one below to make sure that your edges are perfect.

The 3rd and final tool you will need for working with copper pipes is a pipe bending tool. You can use a spring, but we went with a pipe bender. Smaller radius bends can be made by hand, but this tool prevents you from crushing the corners and reducing propane throughput around the bends.

In the UK and Europe, Compression Fittings are used as standard rather than the flare fitting we discussed above. These use small “olives” to make the seal.
If you live in a place where this is the standard connection then you’ll either need to order the above Flare fitting equipment especially (like we did) as they won’t sell it at your local retailer, or you’ll have to have the compression fittings installed in your system.
Don’t lose too much sleep over it if you have no choice, we have one on our Dometic Stove / Sink Combo Unit.
Checking For Leaks
Before you use the system for the first time, make sure you are in a well-ventilated area with no sparks or flames. It’s probably a good idea to turn off your vehicle’s electrical system too.
Turn off all of the appliances and values, close the tank and make sure the solenoid is off.
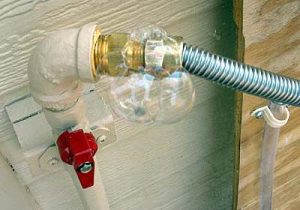
Get a spray bottle with some VERY soapy water (you want lots of bubbles). Shake it and then spray each connection as you work through the system. First open the main cylinder and check the regulator, then turn on the solenoid and finally work you way to each appliance.
If there is a propane leak you will likely smell it first, but you need to check each connection very carefully for bubbles. Take your time, and check the whole system at least twice.
If there are bubbles, try tightening that connection a little (but not too much). If that doesn’t work you should dismantle it and start again with tape and paste.
Once all the connections are leak-free put the kettle on, and invite all your friends around for a go on your new shower 🙂
It’s a good idea to check for leaks again after you have driven the vehicle a little to see if anything has worked itself loose. If it passes the next inspection, it will likely remain leak free for a long time.
Propane Shutoff Valves
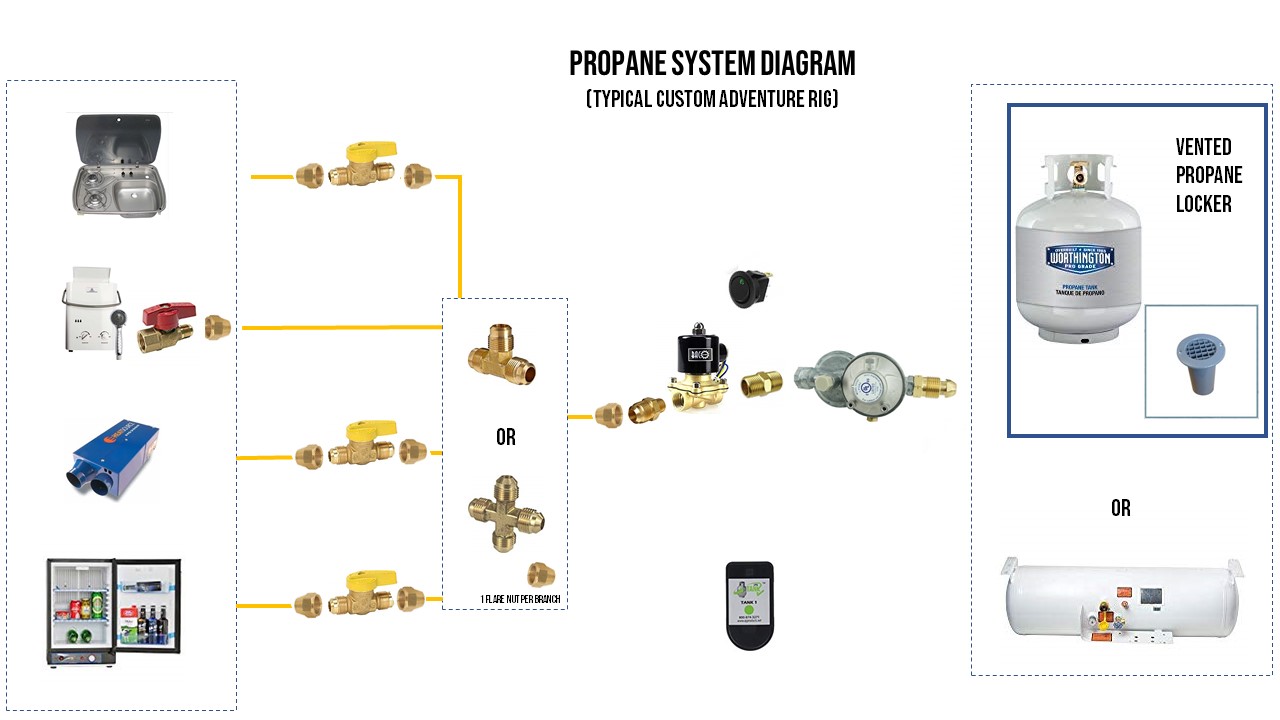
A propane valve is required for each appliance in the system. This is a recommended safety feature and it allows you to isolate an area of the propane system for maintenance. The valve should be installed on each branch of the propane system as shown in the propane system diagram below.

Propane Appliances
Your exact configuration will depend on the number and type of propane appliances you have. Each appliance will have it’s own connection specifications.

Most appliances will be fixed in place so you can run copper pipe all the way to the appliance. 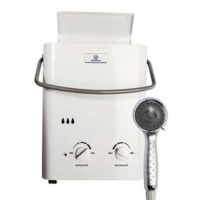 However, you may wish to use rubber pipe for the final few feet to aid removal for future maintenance. Remember that rubber hose perishes and should be checked at least annually.
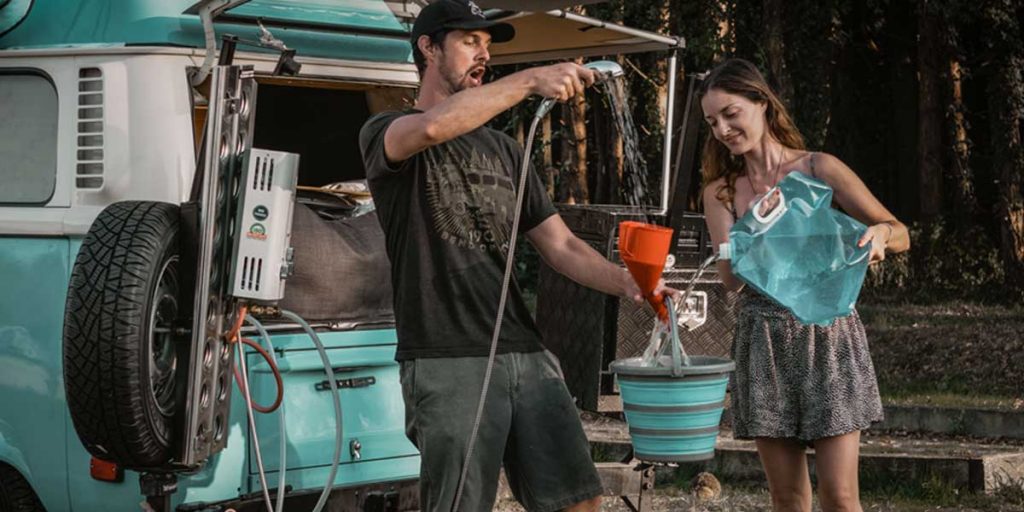
IMPORTANT: If you are installing a instant hot water heater as we did please note that these are not recommended for use inside confined spaces. This is because they get very VERY hot when teuse and secondly because they can dangerously effect the quality of the air.
When people have these instant water heaters installed in a fixed position they are either right at the back of the vehicle and only used when the door is open or they are vented. We have seen a few examples of these van instant hot water shower installations, however as we’ve already had a fire in our van once, are keen to avoid repeating the situation and as such we think this isn’t a good idea.
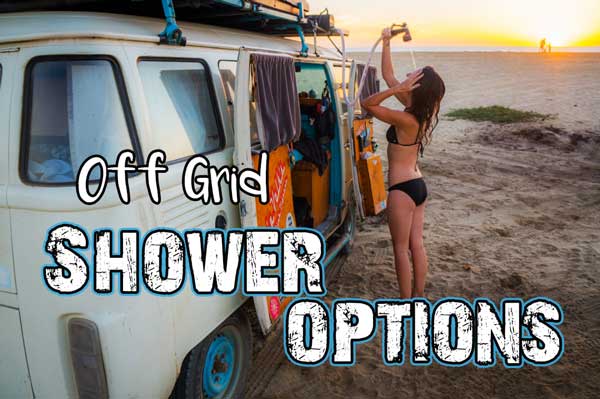
We have installed our instant hot water shower with a quick-release system. The shower lives inside, but we hang it on the outside of the vehicle when in use. It takes about 2 minutes to set up our shower.
Read more about how to build a water system for off grid mobile living in our free guide
Interactive Van Propane System Diagram
Click on the items for more details and current prices on Amazon
Propane Stoves
Instant Water Heater / Showers For Van Life
Check Valve for shower
Connects directly to shower
Propex Heater
Available From GoWesty
3-way Fridge
Runs on Propane AND 12v or 110v which is ideal!
Check it out on Amazon
3/8" Flare Check Valve
3 way 3/8" Tee Flare
Required when there 2 propane appliances
4-way Cross 3/8"
Required when there are 3 propane appliances
Available on Amazon Here
3/8 Male to Flare adapter
3/8 male to male union
12v Switch With Light
Switch to activate solenoid
Available on Amazon Here
2 Stage Regulator
We prefer the 2 stage regulator which you can get on Amazon.
Drop Vent
Required if propane cylinders are installed inside the vehicle
20lb Propane Cylinder
Propane Level Indicator (wireless)
3/8" Flare Nut
(1 Required Per Connection)
3/8" Flare Nut
(1 Required Per Connection)
3/8" Flare Nut
(1 Required Per Connection)
3/8" Flare Nut
(1 Required Per Connection)
3/8" Flare Nut
(1 Required Per Connection)
3/8" Copper Pipe (50ft)
Sealed & Vented Propane Locker
Required if your cylinders are inside your living area.
Build one yourself or buy from Amazon
3/8" Propane Solenoid
Van Propane System Materials List
| Part | Where to Buy | Notes |
| Underslung Propane Tank | GoWesty or Amazon | Recommended Flame King or Manchester Tanks |
| 20lb Propane Cylinder | Amazon | Also available in 5lb & 11lb |
| Single Stage Regulator | Amazon | |
| Dual Stage Regulator | GoWesty or Amazon | Attaches directly to Propane Cylinder |
| 3/8 male to male between solenoid and regulator | Amazon | |
| Propane Solenoid 3/8″ | Amazon | |
| 3/8 Male to Flare (after Solenoid) | Amazon | Optional but recommended |
| 12V Switch with light to activate optional solenoid | Amazon | |
| 3/8″ Copper Pipe 50ft | Amazon | |
| Stainless steel pipe clamps | Amazon | |
| Propane PTFE Teflon Thread Tape | Amazon | |
| Thread “Pipe Dope” | Amazon | |
| Flare Nut | Amazon | 1 per flare connection |
| Pipe Flaring Tool | Amazon | |
| Pipe Cutting Tool | Amazon | Don’t be tempted to cut pipe without one |
| Pipe Bending Tool | Amazon | You’ll do a better job with it than without it. |
| 3/8″ Flared Propane Valve | Amazon | 1 per appliance |
| Valve for Instant Water Heater | Amazon | This connects directly to the shower |
| 3-way Tee 3/8″ flare | Amazon | Required if you have 2 propane appliances |
| 4-way Cross 3/8″ flare | Amazon | |
| 3 Way (12v, 110v, Propane) Fridge | Amazon | Great to have the option of running the fridge of multiple sources when the weather isn’t great |
| Propane Stove | Check out some options here | |
| Propex Heater | GoWesty | More Information |
| Propane Instant Hot Water Heater | Check out some options here | Most popular Shower here |
| Propane shower hose | Amazon | use a hose if your shower is portable and you will be removing it when in use |
| Quick release system | Amazon | We use a system like this with our shower to make it portable (it also means we could quick connect an external BBQ if we wanted to. |
| Carbon Monoxide Detector | Check out some options here | Make sure you have one! |
| Propane level Indicator (wireless) | Amazon | Nice to know when you are going to run out. |

look inside this van life guide here
HAVE YOU SEEN THIS?
Want to know about Van Life Water Systems for Extended Off-Grid Travel?
Watch the video and check out the post